The Notes Edit pane provides a means of viewing and editing notes about the primary component being worked on.
•When the Notes Edit pane is located on a tab presentation, a Contents Exists indicator ![]() might be displayed on the tab when notes are present. NOTE: Only the first Grid Edit, Multi Select, or Notes Edit pane on the tab presentation (as determined by tab order) will be evaluated for the Contents Exist indicator.
might be displayed on the tab when notes are present. NOTE: Only the first Grid Edit, Multi Select, or Notes Edit pane on the tab presentation (as determined by tab order) will be evaluated for the Contents Exist indicator.
•To add to the pane, select ![]() and select the desired note type from the drop-down list. If only one note type is available, the Note Type column will not be shown on the pane.
and select the desired note type from the drop-down list. If only one note type is available, the Note Type column will not be shown on the pane.
•To save the notes grid to the storage device in the file format set by your site's configuration, select ![]() . The
. The ![]() button may not be present on a Notes Edit pane.
button may not be present on a Notes Edit pane.
•To filter the displayed list, enter search terms in the ![]() field. The count of items before the Text Search field indicates the number of items displayed in the list and the total number of items. The
field. The count of items before the Text Search field indicates the number of items displayed in the list and the total number of items. The ![]() field may not be present on a Notes Edit pane.
field may not be present on a Notes Edit pane.
•To remove the note, select the Delete ![]() button. The
button. The ![]() button is only available if the note is not locked and you have sufficient privileges.
button is only available if the note is not locked and you have sufficient privileges.
•To change the width of the columns on the table, place the pointer on the line between the column headings and drag when the pointer changes into the resize pointer. There is a minimum width setting for columns which cannot be overcome.
•To change the order of the columns, select a column heading and drag to the desired position. The preferred width and order of the columns are stored in the User Settings if Remember Grid Column Settings is selected.
•To change the order of the rows, select the column heading and choose ![]() or
or ![]() as desired.
as desired.
•To edit the information in a row, select ![]() or double-click on that row. (You may not have authorization to change the information on some Notes panes.) A pop-up window opens for editing. It can be repositioned and resized to suit your preference. Any changes to the position and size can be stored in your User Settings.
or double-click on that row. (You may not have authorization to change the information on some Notes panes.) A pop-up window opens for editing. It can be repositioned and resized to suit your preference. Any changes to the position and size can be stored in your User Settings.
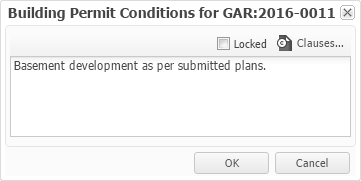
Depending on the browser, misspelled words may be underlined in red. NOTE: The number of characters is restricted to 32000. Select the Locked check box to prevent changes to the text of the note. The required privileges to change the Locked setting for the note may need to be changed.
The Clauses... button may not be visible on the Note Edit pop-up window, depending on whether clauses have been configured for the widget. The button is not available if the pane or presentation is read-only.
Select the Clauses... button (or press Ctrl+L) to open the Select Clauses pop-up window. Here, select the Apply image ![]() button to add the clause to the note. The clause is added at the cursor position and the cursor moves to the end of the applied clause.
button to add the clause to the note. The clause is added at the cursor position and the cursor moves to the end of the applied clause.
•More than one clause can be applied before closing the Select Clauses pop-up window.
•The list of clauses can be filtered by entering search terms in the Text Search field below the title bar.
An indicator indicates how many clauses are displayed and the total number available. The Select Clauses pop-up window can be repositioned and resized to suit individual preferences. Any changes to the position and size can be stored in the User Settings.
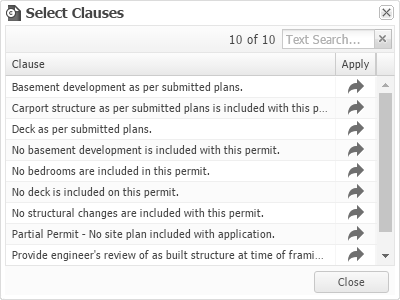
When finished selecting clauses, select Close. Select OK or Cancel in the Note Edit pop-up window to go back to view mode on the Notes Edit pane.
Remember that selecting OK does not save the changes. You must use the ![]() button to do that. A small red triangle appears in the Note column, beside the note text, until the note has been saved.
button to do that. A small red triangle appears in the Note column, beside the note text, until the note has been saved.